4 Hands-On with SQL Code
We just learned that SQL is a language that allows us to interact with and manage a database. Let’s learn some SQL queries to get some hands-on experience.
4.1 Viewing Data
4.1.1 SELECT & FROM
We’re ready to write our first queries! The most common query you’ll use is the SELECT statement. In it’s most basic form, it shows you the data in a table, but you can add option to customize the view you get back. Let’s try! Type this query into the query box:
SELECT
*
FROM
items;
Now click the Execute all button. 
This query asks the database to select everything (* means “everything”) from the table items. It ends with a semicolon to tell the database that this is the end of our request.
SQL doesn’t care if you add extra white space (spaces, tabs, or new lines) to your query to make it easier to read. All that matters is that you use the correct keyword structure and end your query with a semicolon (;). Because of this, the query below does exactly the same thing as the first query we ran.
SELECT
*
FROM
items;SQL ignores capitalization, spaces, and new lines in a query. Some tools which use SQL also ignore semicolons. However, it’s conventional to:
- Write SQL keywords (
SELECT,FROM, and so on) in UPPERCASE - Write table and column names in lowercase
- Write a semicolon
;at the end of the query
4.1.2 Selecting Columns
The items table has a lot of columns. What if we don’t want to see all of the columns in the table? We can ask for just the columns we want to see. Let’s get just the item ID, title, and material type.
SELECT
    item_id,
    title,
    material_type
FROM items;NOTE:
You can order the columns however you’d like in theSELECTstatement and select a column multiple times.
4.1.3 Unique Values
What if we now want to know what all the possible languages are in our data set? We could scroll through the results and try to keep track of unique values, but that is tedious - and we’ll likely miss some, especially if they are uncommon.
Instead we can use the SELECT DISTINCT keywords on one or more columns to show
all the unique values.
Let’s look at the items table again and see which languages our items are published in.
SELECT DISTINCT language_code
FROM items;
If we wanted to see unique combinations across multiple columns, we just add the columns we’re interested in. Let’s see which languages each publisher publishes in:
SELECT DISTINCT
    language_code,
    publisher
FROM items;
4.1.4 Ordering Results
Sometimes sorting data is useful for understanding the output of a query.
With SQL, you can sort on one or more columns with a combination of ascending or descending order using the ORDER BY keyword.
Let’s sort the items table by the year of first publication.
SELECT
    title,
    author,
    first_publication_year
FROM items
ORDER BY first_publication_year;
By default, ORDER BY sorts in ascending order. We can sort in descending order to get users born more recently by adding DESC after the column.
SELECT
    title,
    author,
    first_publication_year
FROM items
ORDER BY first_publication_year DESC;CHALLENGE:
How would you sort items by author in descending order?
4.1.5 Limiting Number of Rows
Sometimes you’ll be working with a large table to analyze with lots of columns and rows. You can use LIMIT to reduce the number of rows the query returns to give you a snapshot of the data you’re working with. Limiting the output is particularly useful when you are building a complex query on a large amount of data. Limiting makes the query quicker so you can see an example of the results more quickly for troubleshooting. Once your limited query returns the results you want, then you can run the full query.
SELECT *
FROM items
LIMIT 10;
4.1.6 Commenting
As we’re writing queries, sometimes we want to write helpful comments to ourselves and others. There’s two ways to write comments so that text won’t be interpreted as SQL.
- Single line comments: text following two dashses “–”:
-- comment here - Multiline comments: text between the characters “/* */”:
/* comment here */
/*
all items in the library system
sorted by first publication year
*/
SELECT
    title,
    author,
    first_publication_year
FROM items
ORDER BY first_publication_year DESC; -- sort most recent to the top
4.2 Filtering Data
Now that we’ve seen some ways to view our data, let’s learn how we can filter our data. This is really the core of SQL, where we can start to answer our own questions about the data!
We use the WHERE clause to filter rows of a query by specifying one or more
conditions. WHERE in this case does not indicate a location. The table below shows comparison operators that can be used and combined with WHERE to create conditions, some of which you may have seen before in other programming languages.
| Comparison Operator | Description |
|---|---|
= |
equals |
> |
greater than |
>= |
greater than or equal to |
< |
less than |
<= |
less than or equal to |
<> or != |
not equal to |
In general, the type of data on each side of the operator needs to be the same: compare numbers to numbers, text to text, and so on. When working with text or date data, it’s necessary to wrap values in single quotes. For instance:
'text_value'is a text value'2000-01-01'is a date
Now let’s write a query to find items checked out from Shields Library:
SELECT *
FROM checkouts
WHERE library_code = 'SHLDS';NOTE: Some relational database query tools require LIKE for text comparisons rather than =.
SQL also provides a variety of arithmetic operators for working with numeric data:
| Arithmetic Operators | Description |
|---|---|
+ |
addition |
- |
subtraction |
* |
multiplication |
/ |
division |
% |
modulus |
4.2.1 AND & OR Operators
Often we’ll need to filter data based on more than one condition. We can ask
WHERE to check multiple conditions with the keywords:
AND, meaning a row must satisfy both conditionsOR, meaning a row must satisfy at least one of two conditions
These are logical operators in SQL that evaluate to TRUE or FALSE.
Let’s find all the items that have been checked out from Shields Library and the Law Library.
SELECT *
FROM checkouts
WHERE library_code = 'SHLDS' AND
      library_code = 'LAW';
You might have guessed that this query would return no records because a physical book cannot be checked in to two libraries at once.
Let’s find all the items that have been checked out from the New Books shelf or Shields Library.
SELECT *
FROM checkouts
WHERE library_code = 'SHLDS' OR
      library_code = 'LAW';
This query returns many books because we’re asking for all the items in both libraries. These last two queries should help illustrate the difference between AND and OR.
NOTE:
AND&ORwill follow the order of operations. To useAND&ORin the same query, wrap parenthesis around theORconditions.
4.2.2 IN Operator
Sometimes we find ourselves writing multiple OR conditions on the same column which can make our query look more complex than it really is. In this scenario we can condense multiple OR conditions using IN.
Let’s rewrite our previous query to use IN.
SELECT *
FROM checkouts
WHERE library_code IN ('SHLDS', 'LAW');
4.2.3 BETWEEN Operator
We can also also filter using ranges of values with BETWEEN. This is handy when you’re working with numerical or date values and you don’t want to list out all possible values to meet your conditions.
Let’s write a query to find all of the due dates for 2020.
SELECT *
FROM checkouts
WHERE due_date BETWEEN '2020-01-01' AND '2020-12-31';CHALLENGE:
How many items checked out (loan_date) for 2019? How many in 2020?
4.2.4 LIKE Operator
The LIKE keyword tests whether text values match a given pattern. There are two different wildcard characters that you can use in the pattern:
_matches exactly one character%matches zero or more characters
Let’s look at an example to indicate we want to match the beginning of a string, but the end is allowed to vary. To show this, let’s find items with a publisher name that starts with “Springer” but can end with anything.
SELECT *
FROM items
WHERE publisher LIKE 'Springer%';NOTE:
The wildcard%can be used multiple times in one pattern.You can also use regular expressions in SQLite to match in more complicated situations. Read more about using regular expressions here.
The LIKE keyword differs between dialects of SQL, so it’s also a good idea to check the documentation for your RDBMS before using LIKE.
CHALLENGE:
Write a query that selects all the items whose publisher has the word “University” in their name?
4.2.5 IS NULL Operator
So far we’ve worked with complete data, but how do we work with missing data? In databases, NULL means missing data. IS NULL is used to test whether there is missing data in a column.
Let’s look at an example to find items where the year of first publication is missing.
SELECT *
FROM items
WHERE first_publication_year IS NULL;CHALLENGE:
How would you write a query to find items with a missing author name?
4.2.6 NOT Operator
There will be times where we want to find only the rows that do not satisfy some condition. To do this, use NOT combined with other operators:
NOT INNOT BETWEENNOT LIKEIS NOT NULL
Below is a query to find items that do not have a certain number of recalls - in this case, we’re excluding items with 0, 1, or 3 recalls.
SELECT *
FROM items
WHERE recalls NOT IN (0, 1, 3);
Why would you do a query like this? Our example seems a little arbitrary, but imagine you’re trying to troubleshoot an issue with data entry. Maybe you suspect something odd happened with recalls that are equal to 2 or greater than 3.
4.3 Aggregating Data
We’ve just looked at a number of ways to filter data, but now let’s look at some ways to aggregate data.
4.3.1 Count
Suppose we want to find out how many items we have in the items table.
We can count the total number of rows in a table using the COUNT function. The function takes a column or * as an argument, but the argument doesn’t actually affect the count.
Here’s how we can use COUNT to answer our question:
SELECT
    COUNT(item_id)
FROM items;NOTE:
You can combineDISTINCTwithCOUNTusingCOUNT(DISTINCT column_name)to get a unique count of values in a column when duplicate values exist.
CHALLENGE:
Find the total number of patrons that have checked out a book.
4.3.1.1 Renaming/Aliasing Columns
In the previous query, notice that the name of the column in the result is
COUNT(id), which isn’t easy to use in subsequent SQL queries or with other
data programming tools.
We can use AS to rename or alias a column in the result of the query.
This is handy if you’re planning to export the result for future use,
especially if you’re sending it to someone else.
In our last query, let’s rename the column to total_items:
SELECT
    COUNT(item_id) AS total_items
FROM items;
4.3.2 Average
The AVG function returns the average value of a numeric column. Let’s find
the average number of recalls placed on items:
SELECT
    AVG(recalls) AS avg_recalls
FROM items;
4.3.3 Sum
We can also sum the values in a numeric column with the SUM function. Let’s
find the total number of loans from outside:
SELECT
    SUM(loans_not_in_house) AS outside_loans
FROM items;
4.3.4 Grouping Data
So now you’ve seen several functions working on a single column, but we sometimes want to summarize our data in more sophisticated ways. Let’s see what grouping can do for our data. Let’s write a query that counts the number of books checked out at each library:
SELECT
    library_code,
    COUNT(item_id) AS books_checked_out
FROM checkouts
GROUP BY library_code;
Notice here how we asked for two columns - the library_code and the count of
item_id.
CHALLENGE:
You can alsoGROUP BYmore than one column by listing the columns to group by with each column name separated by a comma. How would you find the total number of times a patron checked out an item at each library? Note that -1 is the missing value for patron_id.
4.3.5 Having
HAVING is similar to WHERE, but it specifically works with GROUP BY. Perhaps we’re only interested in days that had more than 100 checkouts. Let’s see what that looks like:
SELECT
    loan_date,
    COUNT(item_id) AS books_checked_out
FROM checkouts
GROUP BY loan_date
HAVING COUNT(item_id) > 100
ORDER BY books_checked_out DESC;
Now we’ve seen how we can use functions to aggregate data and how grouping data can give us meaningful insights. There are, of course, other functions available in SQL and we can’t go over all of them here, but now you’ve seen how they work and can apply your knowledge to new functions you find.
4.4 Joining Data
Joining tables allows us to combine information from more than one table into a new table. The tables need to have a key column to be able to link the tables together. A key is a column that contains information that allows it to relate to information in another table. In our Library Checkouts ERD, the item_id column in items is a key column that links to item_id in checkouts.
4.4.1 JOIN Types
SQL has 4 main kinds of joins:
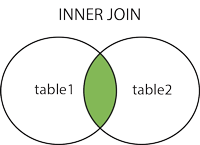
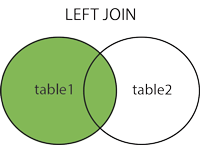
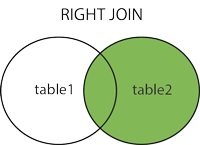
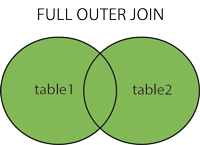
NOTE:
The above images come from the W3Schools’ SQL join page, an excellent resource for learning more about SQL.
What kinds of joins are there?
INNER JOIN: Returns rows that have matching values in both tables; it gets you what’s in the middle of the venn diagram.LEFT JOIN: Returns all rows from the left table, and the matched rows from the right table; the “left” table is the first table you write in the query.RIGHT JOIN: Returns all rows from the right table, and the matched rows from the left table; the “right” table is the second table you write in the query or the “join” table.NOTE:
This is not supported in SQLite, however switching the tables in aLEFT JOINwill emulate aRIGHT JOIN.FULL OUTER JOIN: Returns all rows when there is a match in either left or right table; nulls are generated in the table when a row in one table doesn’t have a match in the other table.NOTE:
This is not supported in SQLite, however you can emulate aFULL OUTER JOINdescribed here.
4.4.2 JOIN steps
JOIN queries typically take this form:
SELECT
  left_table.column1,
  right_table.column1,
  ...
FROM left_table
  [INNER | LEFT] JOIN right_table ON left_table.key_column = right_table.key_column;
Below are the steps for writing a JOIN:
SELECTthe columns we want in the output. Be sure to refer to the columns using their table name (table.column) to disambiguate columns with the same name in two or more tables, like our item_id columns.- The
FROMstatement indicates which table to start with (this is our “left” table). - The
JOINstatement indicates which table should get joined (this is our “right” table). Before the keywordJOIN, you can specify the direction of the join such asINNER,LEFT, orRIGHT. - Finally, we indicate which columns the join should be based on with
ON. The columns you choose here should contain information tha allows you to match records (rows) between the two tables.
4.4.3 INNER JOIN
Let’s try an INNER JOIN to see how this works:
SELECT
    items.item_id,
    items.title,
    checkouts.item_id,
    checkouts.due_date
FROM items
INNER JOIN checkouts ON items.item_id = checkouts.item_id;
We interpret the INNER JOIN query as, “all books that have been checked out.”
4.4.4 LEFT JOIN
Now let’s try a LEFT JOIN:
SELECT
    items.item_id,
    items.title,
    checkouts.item_id,
    checkouts.due_date
FROM items
LEFT JOIN checkouts ON items.item_id = checkouts.item_id;
We interpret the LEFT JOIN query as, “all books and if they have been checked out or not.”
CHALLENGE:
Can you write a query that contains the title of the books and the ID of the patrons that checked them out?
4.5 Subqueries
So far we’ve been working with one SELECT statement, but we can actually combine multiple SELECT statements using subqueries. Subqueries are nested queries enclosed in parentheses that can be used with other keywords like JOIN and WHERE. Below are 2 examples of these use cases.
You can think of a subquery as a process where you write a query to create a table, then query the table you just constructed. This can be especially helpful with large complex tables where simplifying helps you understand the query better, or when you need to complete a multi-step query and don’t want to make extra tables or views (something we’ll cover in the next sections).
Let’s first look at a subquery in the WHERE clause:
-- main query
SELECT *
FROM checkouts
WHERE item_id IN (

    -- subquery

    SELECT item_id
    FROM items
    WHERE resource_type = 'Microforms'
);
We retrieved microforms in a subquery. We then use the results of the subquery to filter the checkouts table using checkouts.item_id. In the end we get, “all checked out microforms.”
NOTE:
When writing a subquery withWHEREandIN, the subquery must select only one column forINto filter on.
Now let’s look at a subquery with JOIN:
SELECT
    -- get the columns we want from both tables
    checkouts.patron_id,
    microforms.title,
    checkouts.loan_date,
    checkouts.due_date
FROM checkouts
INNER JOIN (
    -- subquery to get all the items in microform format
    SELECT *
    FROM items
    WHERE resource_type = 'Microforms'
) AS microforms ON checkouts.item_id = microforms.item_id;
We retrieved microforms in a subquery, just like before. Next, we write the subquery after JOIN and alias it microforms. Finally, we join on the keys and return the columns we want in the main SELECT statement. Both subquery examples are just different ways to get to the same result, “checked out hardcover books.”
NOTE:
Why would you want to make such a complex query? First, the sub query can help us limit large or complex tables, or join data before we query it. Second, subqueries give you the ability to create a “new” table on the fly, even if that table didn’t exist in the database before, without having to save it.
4.6 Saving Query Results
There will be times when we want to save the results of a query so we can reuse it later when needed. Two commands to save a query as a new database object follow:
CREATE TEMPORARY TABLE- This is a new table added to the database, just like the tables you’ve been working with, except it is only available in the current session. You typically do this to break down a complex problem into intermediate steps and pass your saved results to the final query.
CREATE VIEW- A view is simply a saved query that can be executed when called. The query you save will usually be made up of multiple tables with added conditions if needed. You can use it in pretty much the same way you would a table. The only major difference is that a view, because it is updating from other tables, is not able to be edited.
If we want to create a temporary table, we just need to add CREATE TEMPORARY TABLE our_new_table_name AS at the beginning of the query (adding in our own table name, of course). This is what it looks like:
CREATE TEMPORARY TABLE mircoform AS
    SELECT
        -- get the columns we want from both tables
        checkouts.patron_id,
        microforms.title,
        checkouts.loan_date,
        checkouts.due_date
    FROM checkouts
    INNER JOIN (
        -- subquery to get all the items in microform format
        SELECT *
        FROM items
        WHERE resource_type = 'Microforms'
    ) AS microforms ON checkouts.item_id = microforms.item_id;
At the time of writing, SQLiteStudio has a bug where accessing temporary tables is complicated. The good news is that for the most part, you probably won’t need this option. You can use subqueries instead or use a View if you know you’ll need continued access to the results of a query.
In much the same way we made the new table, we can make a view:
CREATE VIEW mircoform AS
    SELECT
        -- get the columns we want from both tables
        checkouts.patron_id,
        microforms.title,
        checkouts.loan_date,
        checkouts.due_date
    FROM checkouts
    INNER JOIN (
        -- subquery to get all the items in microform format
        SELECT *
        FROM items
        WHERE resource_type = 'Microforms'
    ) AS microforms ON checkouts.item_id = microforms.item_id;
4.7 Data Management
4.7.1 Update Tables
You might have noticed at the beginning the items table has NULL values across different columns. We can fix this fairly easily, but we need to be careful. It’s challenging to undo something in a database so we want to be sure we’re doing it right. Let’s update the NULL values in the items.receiving_date column to “N/A”.
It’s first helpful to write a query to be sure these are the rows you want to update:
SELECT *
FROM items
WHERE receiving_date IS NULL;
Once you’ve confirmed, the below statement updates the NULL values to “N/A”
UPDATE items
SET receiving_date = 'N/A'
WHERE receiving_date IS NULL;
The SET keyword specifically targets just the receiving_date column and replaces NULL values with “N/A” when the condition is met in the WHERE clause. It leaves the other values alone. If the WHERE clause is removed, it will set all values in the whole column to “N/A” overwriting the users address, so proceed with caution!
4.7.2 Add & Populate a Column
Sometimes we want to make a new column and add data into it. Let’s make a new column called year in the patrons table and populate it with the year parsed from the creation_date column.
First we’ll add the column and set the default value to “N/A”:
ALTER TABLE patrons
ADD year INTEGER DEFAULT 'N/A';NOTE:
TheDEFAULTargument is optional, but if you leave it blank, it will make the default value NULL.
Now we update all values with the results of a string parsing cution that returns the year from our created_date string. SQLite has time-date functions, but the date format of our data is not the format SQLite prefers, so when something like this happens, you need to get a little creative to get the information you want.
UPDATE patrons
SET year = substr(creation_date, -4, 4)
WHERE creation_date IS NOT NULL;
The function substr() creates a substring from a string object - in this case, our creation_date string. The second argument, -4, indicates the position to start the substring from. Negative values tell the function to start from the right side of the string (or the end of the string) rather than the left. Finally, the third argument indicates how many characters to include. We chose 4 because our date string has a 4 digit year.
Want to see what our update query did?
SELECT * FROM patrons;